Showing posts with label how to. Show all posts

Thursday, July 14, 2016

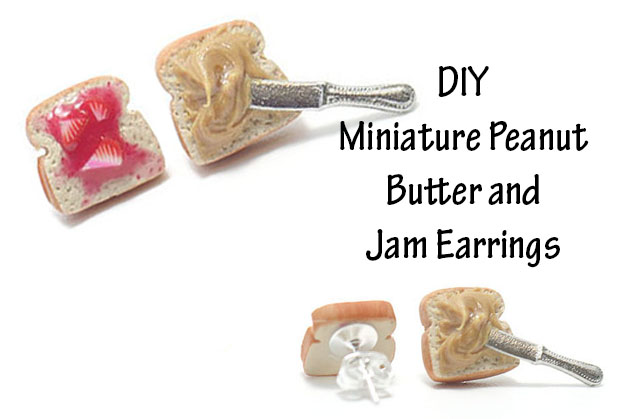
Skill Share DIY Peanut Butter and Jam Earrings


I wanted to try something out that's a little different then YouTube this week. This is a website called Skill Share! Skill Share is a wonderful place where you can learn or teach anything. I have been having a lot of stress and been super depressed about a lot of things last week. I thought it was time to try something new. I hope to have a full blog post as to whats going on in my life, once I get a hold of it myself. I do hope you will stick around to find out more. Also not to worry, as of right now I am still going to be posting onto YouTube.
Please let me know what you think of this kind of a video format. I would love feedback. I do hope you enjoy this simple DIY!
Link: Peanut Butter and Jam Miniaiture Earrings

Tuesday, April 28, 2015

Vegan Ricotta

I am soo happy with how this recipe turned out. I hope you enjoy it as much as I do!

Ingredients  
1 clove garlic
1 (14 oz) package of extra firm tofu, drained
2 tablespoons lemon juice
1 teaspoon salt
1 teaspoon black pepper
3 cups fresh basil

Steps
In a food processor, combine all ingredients. Pulse until everything is combined, but mixture still has some texture. Season to taste. Now time to enjoy on anything that needs some ricotta added like yummy pasta! Enjoy!

Ricotta can be made the day before and stored in the fridge.


Monday, April 20, 2015

First DIY Candy Kit

So what do you think of videos like this? I hope you enjoy it. More to come soon! Please LIKE the video if you enjoyed it! Thanks for watching and Please "Subscribe" to my channel.

Tuesday, March 31, 2015

Steamed Whole Artichokes

Happy spring everyone! One of my favorite things about spring is artichokes. I get this question a lot, how do you cook artichokes so here we go!

Steps
Using a knife cut off the stems close to the base, also pull of the lower petals that are small and tough.
Place the artichokes in a steaming basket that is in a pot of water, the water should only come to the top of the basket.
Turn on the Stove.
Once the water has boiled turn the heat down to mid love and cook for 30-40 min (If you have a very large artichoke you may need to steam it longer.)
How to eat!
Pull off a leaf and scrape the "meat" off that is at the base of the leaf. 
You may also take the leaf and dip it in vegan mayo or butter then scrape off the "meat"
Enjoy!


Wednesday, March 25, 2015

How to Make Kombucha

Kombucha contains high levels of antioxidants, b-vitamins, probiotics and glucaric acid. It has been reported to have a variety of health benefits. Find out about Kombucha here.

Kombucha is brewed from sweetened tea, most of the sugar ferments out. It is made caffeinated or green tea. When you are starting this for the first time I wouldn't sagest herbal teas unless you have a PH meter.

The Kombucha is brewed with a SCOBY (Symbiotic Colony of Yeast and Bacteria) that “eats” the sugars and the caffeine in the tea and creates an acidic, vitamin and probiotic rich beverage. Find out more about SCOBY here.


How to Get a SCOBY?

SCOBYs are living and thriving colonies of bacteria and unfortunately, you can’t just pick one up at your grocery store. 
I got mine from a friend, this also seams like the easiest way to get one. This is called a "baby" SCOBY. Every time you make a batch of kombucha the SCOBY makes a "baby". :P Funny I know.
You can order your own here
Or try to grow your own but I haven't tried this.

One last thing

Make sure your hands and everything is clean before you start for no cross-contamination.

How To Make Kombucha
Ingredients:
  • One gallon glass jar
  • A SCOBY
  • 3 tea bags black or green tea (I use organic green tea)
  • 1/4 cup organic sugar
  • Cheese cloth with a rubber band
Prepare the sweet tea. Boil the water, add the sugar to the glass jar. Add in just enough water to cover the sugar and swish the jar around trying to dissolve all the sugar. (DO NOT use a spoon of any kind we don't want to touch the tea at all)
Then add in the rest of the hot water, leaving just 5 cm of space for the SCOBY. (You can see this in my first photo.)
Let the tea cool to room temperature. (If the tea water is too hot it can kill your SCOBY.)
Pour in 1/4 from the old kombucha that the SCOBY was in into the new jar.
With clean hands take the SCOBY out of its old jar. You can now take off any old layers if its getting too big.
 Gently place the SCOBY at the top of your jar. (The SCOBY doesn't always float its fine what ever it wants to do.)
Let sit to ferment for around 5 days at the least up to a month. (I like to leave mine for 7) You can test the Kombucha by placing a straw in the jar carfully. It should taste tart but still very slightly sweet.
You can add what ever fruit or fruit juice to add some flavor to your tea. I like to drink it as is. I quite like the taste.
*  (You don't have to do this step.)Now the Kombucha is ready for a second ferment. Pour the Kombucha into another jar with an airtight lid and seal for about 3 days. This adds the bubble to your drink. 
Have you  made Kombucha before what do you think?
What is your favorite thing to add to yours?


Here is a photo of me steeping the tea


Old jar to the left and new tea to the right
I am just about the add the old Kombucha to the new jar
This is the old jar of Kombucha


Here you can see "mother" SCOBY (left) with "baby" (right


They can get pretty big

New jar brewing up

Onto second ferment


Time to drink :D

Tuesday, August 19, 2014

New Tutorial how to make a miniature Doughnut

Hi everyone! Today I will be teaching you how to make a miniature doughnut using polymer clay. I will then be teaching you how to use/ make different toppings for the doughnuts.

Missed the video on how to make the icing? See it first: https://www.youtube.com/watch?v=-kl0uNHeEZA&list=UUW0JNWlUeAUp6dcFfnR2ixw&index=5


Did you make your own? I'd love to see it! Share with me photos by using the hashtag #candiwarehowto on Instagram and Twitter!

New to polymer clay? Check out A Guide to Polymer Clay:
https://www.youtube.com/watch?v=Ag6Z4H-QX1E&list=UUW0JNWlUeAUp6dcFfnR2ixw

Wednesday, August 6, 2014

Fimo 101 Liquid Clay


New Tutorial, What is liquid polymer clay, and how to make it into icing and tea! I hope you enjoy it. Next week I will be posting my first mini food tutorial. So stay tooned  :)

Tuesday, July 8, 2014

InnerSpace Interview!

If you remember I posted a little while back about getting ready for an interview with InnerSpace. (If not here is a link) Anyways the interview went well! You can't even tell I was a little under the weather :P I am so super happy with how the video turned out. I hope you like it too.

InnerSpace
In other news my day job which I also love! I'm a layout artist for Guru studio in Toronto. Here is what is left of the original layout team from a show called Justin Time. The show won a 2014 CSA trophy! (Canadian Screen Award) So whats not to love how cool right.

Thursday, May 9, 2013

Miniature Plate Tutorial


Here is a little video to help get you inspired to make little plates and bowls. I hope you like it.


© CandiWare. Powered by